|
|
MECHANIZED
TECHNIQUE FOR ROOT CANAL PREPARATION |
Jesus
Djalma Pécora
DDS,
MSc, PhD, Professor and chairman, Department of Restorative
Dentistry, School of Dentistry of Ribeirão Preto, University
of São Paulo (FORP/USP)
Alexandre
Capelli
DDS, MSc in
Endodontics, Department of Restorative Dentistry, School of Dentistry
of Ribeirão Preto, University of São Paulo (FORP/USP)
This technique associates two different systems for root canal preparation: nickel-titanium (NiTi) rotary instrumentation and oscillating instrumentation with stainless-steel files, varying the taper.
The use of two systems aims to optimize cleansing and shaping of the root canals, thus preserving tooth structure. In addition, this technique attempts to minimize significantly the likelihood of breakage/separation, particularly of NiTi rotary instruments. When the oscillating system is utilized previously to the rotary systems, a direct and uniform “pathway” is easily created inside the root canal. Thus, the tip of the rotary instrument remains free, which dramatically reduces the risk for torsional failures and separations. When the file tip works freely inside the canal, acting solely as a guide, and all the effort is directed to the areas of the instrument with greater metallic structure, the instrumentation is rendered rapidly and safely.
At last, we suggest that the preparation of the apical third be complemented. Recent peer-reviewed scientific data (WU et al. 2001; TAN & MASSER, 2002) have shown that the apical anatomic diameter has been underestimated and hence underinstrumented. Molar root canals, for example, which used to be prepared up to #25 files, are currently prepared at least up to #40 or #45 instruments (see “Shock of Paradigms on the Instrumentation of Curved Root Canals” at http://www.forp.usp.br/restauradora/rotatorios/rotatorios.html).
For an increased apical enlargement, we recommend the use of instruments with greater taper - taper .02 instruments -, in which there is an increment of 0.02 thousandths of millimeter at each millimeter, from the tip of the file to the handle, thus making these instruments more flexible than the taper .04 and .06 instruments.
Using taper .02 instruments, it is possible to prepare mesial root canals of mandibular molars or buccal root canals of maxillary molars with at least #40 files. In some situations, it will be possible to enlarge the canal up to diameters #50, #55 or #60, depending on the degree of curvature of the root canals.
The mechanized technique for root canal preparation suggested hereby combines the use of the AETTM (Anatomic Endodontic Technology) oscillating system (Ultradent Products, Inc., South Jordan, UT, USA), ProTaperTM nickel-titanium rotary system (Dentsply-Maillefer, Ballaigues, Switzerland) and a set of taper .02 instruments that might be either K3 TM (Sybronendo, Glendora, CA, USA), HERO 642TM (MicroMega, Besançon, France), RACETM (FKG Dentaire SA, La Chaux-de-Fonds, Switzerland) or ProFileTM (Dentsply-Maillefer, Ballaigues, Switzerland) series.
DESCRIPTION OF THE SYSTEMS
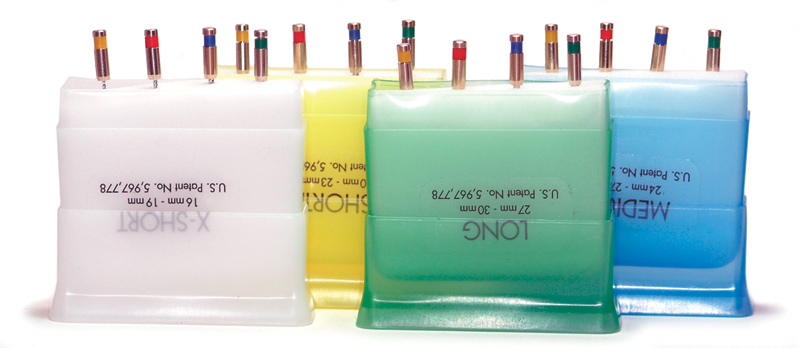
The AETTM system (Figure 1) is composed of four stainless steel instruments with thin, flexible, non-cutting tips. The standard series comprises of three instruments and an additional fourth file (auxiliary) designed to instrument calcified and/or curved canals.
The characteristics of the instruments are the following:
Shaping 1 (yellow): taper .025 and tip diameter = .10 mm
Auxiliary: Shaping C (red): taper .035 and tip diameter = .13 mm
Shaping 2 (blue): taper .045 and tip diameter = .13 mm
Shaping 3 (green): taper .060 and tip diameter = .13 mm
Figure 1. AETTM (Anatomic Endodontic Technology) system (Ultradent)
The ProTaperTM system (Figure 2) comprises of six nickel-titanium (NiTi) instruments. The first three instruments were designed for shaping of the cervical and middle thirds of the root canals and are termed Shaping files. The other instruments are used for optimally finishing the preparation of the apical third of the root canals and are therefore called Finishing files. The instruments designed for preparation of the cervical and middle thirds are divided in Shaping 1 (S1), Shaping X (SX) and Shaping 2 (S2), whereas those used for finishing the instrumentation of the apical third are divided in Finishing 1 (F1), Finishing 2 (F2) and Finishing 3 (F3). The most remarkable characteristic of ProTaperTM NiTi rotary files is the progressively larger tapers over the length of their cutting blades. For example, Shaping 1 (S1) file has a tip diameter of .19 mm and a 14mm-length cutting blade with taper ranging from .025 to .19.
![]() Shaping
X (SX)
Shaping
X (SX)![]() Shaping
1 (S1)
Shaping
1 (S1)![]() Shaping
2 (S2)
Shaping
2 (S2)![]() Finishing
1 (F1)
Finishing
1 (F1)![]() Finishing
2 (F2)
Finishing
2 (F2)![]() Finishing
3 (F3)
Finishing
3 (F3)
Figure 2. ProTaperTM Rotary System
(Dentsply-Maillefer)
The taper .02 files are the most flexible among all NiTi instruments. The progressive increase of the diameter of the cutting blade, from the tip towards the handle, is of only 0.02 thousandths of millimeter at each millimeter. Therefore, there is not an accentuated increment of metallic structure, which makes these instruments more flexible. Taper .02 instruments are well indicated when one need to surpass curvatures or enlarge the apical stop, because they remarkably reduce the apical deviation. Once again, it is important to highlight that the use of taper .04 and .06 instruments must be limited to the preparation of the cervical and middle thirds of the root canals. Figure 3 illustrates the progressive taper increase on taper .02 instruments.
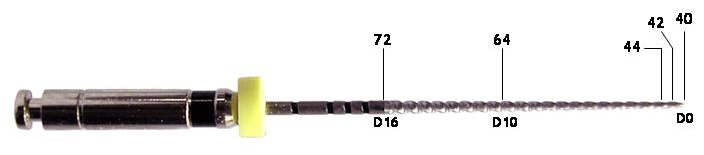
Figure 3. Close-up view of a 40/.02 ProFileTM instrument with the numbering that illustrates the progressive taper increase
OPERATION GUIDELINES
I. Instrumentation with the AETTM oscillating system
Step 1: Determine the tooth length in the x-ray taken for diagnosis and subtract 3 mm from the measurement obtained. Ex: tooth length in the x-ray = 21 mm - 3 mm = 18 mm.
Step 2: Attach Shaping 1 (yellow) oscillating instrument to the handpiece, positioning it at the previously determined length (Figure 4).
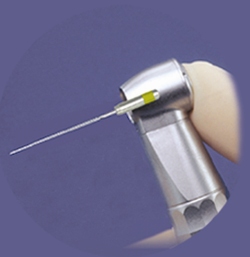
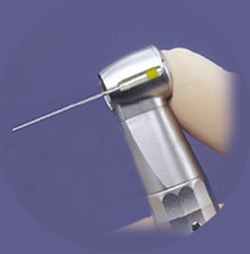
Figure 4. AETTM oscillating file attached to handpiece, demonstrating the adjustment of the length
Kinematics: Move the instrument from one side to another of the root canal, following its long axis. Make anti-curvature movements without forcing the tip of the instrument towards the apex, but firmly, with a brushstroke action against the lateral walls of the tooth (Figure 5).
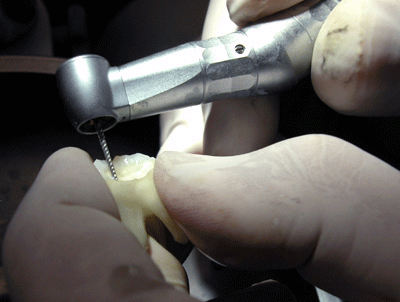
Figure 5 Schematic
drawing illustrating the modus operandi of the AETTM
oscillating system.
Root canal preparation with the AETTM
system, during a laboratorial training.
Step 3: Attach Shaping 2 (blue) oscillating instrument to the handpiece, positioning it at the previously determined length.
Kinematics: Repeat kinematics described for Step 2.
Step 4: Attach Shaping 3 (green) oscillating instrument to the handpiece, positioning it at the previously determined length.
Kinematics: Repeat kinematics described for Step 2.
Step 5: Insert manually the Shaping 1 (yellow) oscillating instrument into the root canal to determine the working length (WL).
Step 6. Attach Shaping 1 (yellow) oscillating instrument to the handpiece, positioning it at the working length previously determined by means of an x-ray or an electronic apical localizer.
Kinematics: Move the instrument from one side to another of the root canal, following its long axis. Make anti-curvature movements without forcing the tip of the instrument down to the apex, but firmly, “brushing” the file against the lateral walls of the tooth. The instrument will reach the WL, with no need to force it towards the apical region.
From this moment on, the root canal is ready to be shaped with the ProTaperTM rotary system. The great taper of S1 and SX ProTaperTM instruments will provide an adequate enlargement of the cervical and middles thirds, thereby facilitating the further preparation of the apical third.
II. Instrumentation with the ProTaperTM rotary system
Step 1: Attach Shaping File 1 (S1 - purple) to the handpiece, positioning the silicon stopper at the predetermined WL.
Kinematics: The instrument should be inserted into the root canal at the pre-established working length and forced against the walls on its removal. Repeat this movement, if required, until all cervical interferences are eliminated. This instrument has a kinematics similar to that of a Hedstroem file. “The file should be inserted into the root canal and removed with pressure against the dentinal walls. An anti-curvature movement should preferably be done to eliminate any cervical interferences. The ‘brushing’ movement on the removal of the instrument avoids its tip to be forced and prevents breakage”.
Step 2: Attach Shaping File X (SX - golden), positioning the silicon stopper at the length reached with the Shaping File 1 (S1).
Kinematics: Insert the shaping file (S1) into the root canal, tractioning the instrument against the dentinal walls while it is removed from the canal (“brushing” action from inside to outside the root canal). Repeat this movement, if required, until all cervical interferences are removed.
Step 3: Attach Shaping File 2 (S2 - white) to the handpiece, positioning the silicon stopper at the WL.
Kinematics: Insert the shaping file (S2) into the root canal, tractioning the instrument against the dentinal walls while it is removed from the canal (“brushing” action from inside to outside the root canal), in the same way as described for S1 and SX.
Step 4: Attach Finishing File 1 (F1 - yellow) to the handpiece, positioning the silicon stopper 0.5 mm from the working length.
Kinematics: Insert the finishing file (F1) into the root canal at the predetermined length (0.5 mm from the WL). There is no need for tractioning the instrument against the dentinal walls. The kinematics of the finishing files is similar to that of the Gates-Glidden burs, i.e., the instrument is inserted into the root canal and when the desired length is reached, it is removed in a single movement (Figure 6).
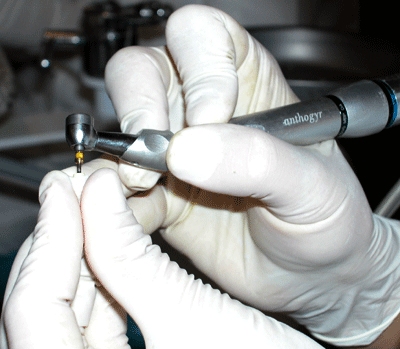
Figure 6. ProTaperTM Finishing 1 (F1) rotary file operating at an Anthogyr pneumatic handpiece.
Step 5: Attach Finishing File 2 (F2 - red) to the handpiece, positioning the silicon stopper 1.0 mm from the working length.
Kinematics: Make movements in the same way as described for Finishing File 1 (F1).
Step 6: Attach Finishing File 3 (F3 - blue) to the handpiece, positioning the silicon stopper 2.0 mm from the working length.
Kinematics: Make movements in the same way as described for Finishing File 1 (F1) and Finishing File 2 (F2).
The flexibility of the ProTaperTM system files decreases as the diameter and taper increase. Therefore, in spite of being nickel-titanium instruments, files of greater caliber are inherently and proportionally less flexible and should not operate at the working length in teeth with accentuated curvatures.
An alterative approach to increase flexibility is to decrease the taper of the instrument. A #40 taper .02 instrument is more flexible than a #40 taper .04 or .06 instrument. So, the use of taper .02 instruments is mandatory to perform the apical enlargement. Ideally, non-tapered or parallel files should be used at this stage, which would result in significant gain of flexibility and allow for mechanical preparation of the apical third with instruments of greater tip diameter. When the surgical removal of the apical portion (microsurgery) is not accomplished, the use of interappointment dressing becomes a demand. On the other hand, if the apical portion is appropriately instrumented and most part of the contaminated dentin is removed, the use of intracanal medication can be rendered more effectively or even be suppressed from the treatment protocol, in some cases.
Instrumentation of the apical third with taper .02 instruments
At this stage, it is important to regard the curvature radius of the roots (Figure 7).
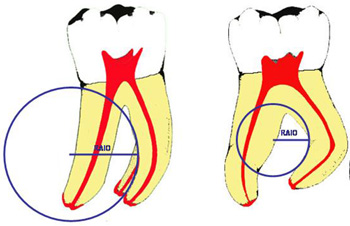
Figure 7. Schematic drawing illustrating root canals with large curvature radius and small curvature radius
The smaller the curvature radius, the lesser the enlargement of the apical third. For root canals with small curvature radii, one should not exceed the diameters 35/.02 and 40/.02. For root canals with large curvature radii, i.e. slightly curved canals, the apical enlargement can be done using instruments of greater caliber, such as 50/.02 or even 60/.02. If required, taper .04 and .06 instruments may be used to optimize the shaping of the canal, thus providing a smooth, uniform conical shape. Nevertheless, due to their limited flexibility, taper .06 instruments should not operate at the working length.
|
Edição |
Atualização |
|
WebMasters do Laboratório de Pesquisa em Endodontia da FORP-USP Eduardo Luiz Barbin Júlio César Emboava Spanó Jesus Djalma Pécora |
31/10/04 |